Some projects you build because you need them. Some you build because they’re good practice. And some come out of a kid deciding he wants to make something real for his 4H project — and then actually doing it.
My son is 11. This was the first year 4H dropped the age requirement for welding — it used to be 13 — so it was the first year he could enter at all. He wanted a fire pit for the farm, so we started looking for ideas online, found one we liked, tweaked it a little, and got to work.
Before going further: this is not a beginner’s first project, and I wouldn’t hand it to most 11-year-olds. He’s been welding almost four years now — mostly stick and TIG, and he runs 7018 really well. MIG is actually his newest process; he’d only been on the wire about six months when he built this. So he came in with real torch time and a good eye for a puddle, just not much of it on this process. If you’re building this with a kid, read it as a project you do together with them running the welder — not one you turn them loose on.
The design he landed on isn’t a simple ring-and-legs setup. This is a DIY welded fire pit in the fully fabricated sense: 2″ angle iron frame and legs, 1-1/2″ square tubing for the foot rest, and a hopper-style 1/8″ plate firebox that tapers toward the bottom to concentrate the coals. Functional, solid, and a project that has a lot to teach about layout, fit-up, and sequencing.
Here’s how we built the DIY welded fire pit, start to finish.
What You’ll Need
- MIG welder — 0.035″ ER70S-6 wire, C10 gas (90% argon / 10% CO2). Most shops run 75/25 for short circuit and that works fine here. I run C10 because my machine will pulse MIG, and C10 covers both — pulse and standard short circuit off the same bottle, so I’m not swapping gas or keeping two cylinders around.
- Angle grinder with flap disc and cutoff wheel
- 2″ x 2″ x 3/16″ angle iron (top frame and legs)
- 1-1/2″ square tubing (foot rest)
- 1/8″ mild steel plate (hopper firebox)
- Measuring tape, speed square, and level
- Clamps and soapstone
- PPE — helmet, gloves, jacket, safety glasses
- Nice to have: a welding fixture table (we used a Fireball) and a cold cut chop saw (Evolution S15CPS) — neither is required, but both make this build easier
The Design: Anatomy of a DIY Welded Fire Pit
Finished, it stands 30″ x 30″ at the top frame and 18″ tall overall. The fire pit has three main components:
The frame. A square ring built from 2″ angle iron that forms the top of the fire pit. In effect, everything else attaches to or hangs inside of this frame.
The legs and foot rest. Next, four legs of 2″ angle iron drop from the frame corners. A foot rest — a lower square ring of 1-1/2″ square tubing, set 6″ up from the bottom of the legs — ties the legs together and adds rigidity. It also gives you somewhere to rest your feet by the fire, which is a nice touch.
The hopper firebox. 1/8″ plate cut and welded into a tapered hopper that hangs inside the frame. Ours tapers from 29″ across the top down to an 8″ x 8″ bottom plate, which concentrates coals hard toward the center. Notably, the hopper hangs from the underside of the frame rather than sitting down inside it — the panel tops are flush with the bottom of the angle iron and welded there, so the full 2″ of frame stands proud as a rim above the firebox. Meanwhile, drain holes in the bottom let ash fall through and allow airflow.
| PRO TIP: Sketch the design on paper before you cut anything (we used soapstone and squares on the shop floor). Write a cut list. Count every piece. This is a multi-component project with several parts that need to fit together — a cut list saves you from finding out mid-project that you’re short on material. |
The Cut List
These are the numbers for our DIY welded fire pit — a 30″ x 30″ frame at 18″ overall height. Adjust to your own dimensions:
| Part | Material | Qty / Size |
| Frame sides | 2″ angle iron | 4 pieces @ 30″ (mitered 45° at corners) |
| Legs | 2″ angle iron | 4 pieces @ 16″ (adjust for desired height) |
| Foot rest sides | 1-1/2″ sq tube | 4 pieces @ 27-1/2″ (mitered 45°) |
| Hopper side panels | 1/8″ plate | 4 trapezoids, 29″ top x 8″ bottom |
| Hopper bottom | 1/8″ plate | 1 piece @ 8″ x 8″ |
Step 1: Build the Top Frame
First up, the top frame is a square ring of 2″ angle iron with mitered corners. Notably, the angle faces inward and down — this gives the frame its rigidity and creates the flat underside the hopper welds up to.
- Miter-cut all four frame pieces at 45 degrees on each end. Double-check that opposite pieces are identical in length. A cold cut chop saw (we ran an Evolution S15CPS) earns its keep here — it cuts square and clean without the heat discoloration and burr cleanup an abrasive wheel leaves behind, and on eight miters that adds up.
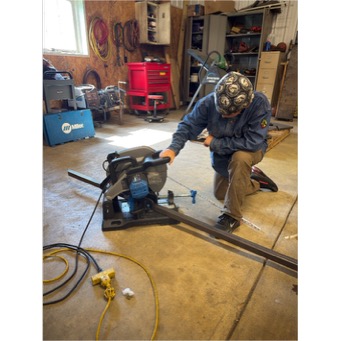
Miter-cutting frame stock on the cold cut saw. Eight clean 45s with no burr cleanup and no heat discoloration — worth the setup on a build like this.
- Lay all four pieces on a flat surface, inside face up, and assemble the square. Use a speed square to check each corner. Moreover, if you have access to a fixture table — we used a Fireball — this is where it pays off: the flat reference surface and clamping holes let you lock the frame square before a single tack goes in.
- Then verify square by measuring diagonals — equal diagonals confirm square corners.
- Clamp all four corners and tack each one — one tack per corner, inside of the miter joint.
- Recheck square. Heat from tacks can pull a corner. Adjust before committing.
- Finish-weld all four mitered corners, inside and outside. These welds carry the weight of the firebox and everything in it — run full passes.
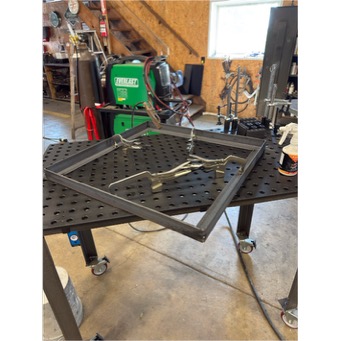
The top frame tacked up square on the fixture table — mitered corners locked with vise grips before any finish welding. Note the angle facing inward and down.
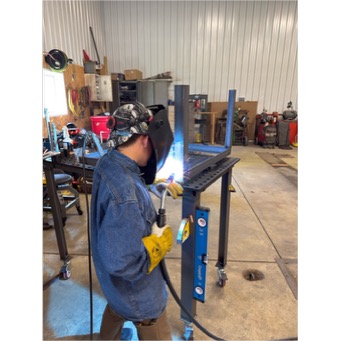
Finish-welding the frame corners. The level and speed square stay on the table the whole build — square gets checked before and after every tack.
| PRO TIP: Weld mitered corners in a cross pattern — one corner, then the opposite corner, then the remaining two. This balances heat input and keeps the frame from pulling out of square as you weld. |
Step 2: Attach the Legs
The legs attach to the four corners of the frame, dropping down from the underside of the frame angle. Nest each leg so its two faces align with the frame’s outside corner — the open back faces inward, which hides the cut edges and gives you two clean weld lines. Of course, they need to be plumb, equal length, and positioned so the fire pit sits level.
- Mark the leg attachment points at each corner on the underside of the frame. Align each leg’s outside faces flush with the frame’s outside corner.
- Clamp the first leg in position — check plumb with a level on two adjacent faces before tacking.
- Tack the leg, then check plumb again. Tacks pull. Adjust before adding more.
- Repeat for all four legs. After all four are tacked, set the frame on a flat surface and check for rocking. All four feet should contact the surface. Adjust any leg that’s off before finish-welding.
- Finally, finish-weld all four legs at the frame connection — run a continuous weld down both outside faces of the angle and across the top edges where the leg meets the frame. Above all, these are the load-bearing welds — don’t shortcut them.
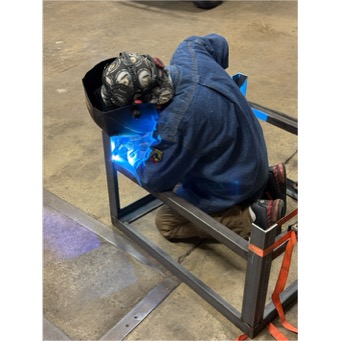
Welding the legs with the frame inverted and ratchet-strapped down. Flipping the assembly puts the leg-to-frame joint in a comfortable position instead of overhead.
The way he worked it: square up one leg, get it right, then square the next one off both the frame and that first good leg. He didn’t just trust the square either — he measured outside to outside on the frame and the legs and made sure the numbers matched.
Step 3: Build and Attach the Foot Rest
The foot rest is a lower square ring of 1-1/2″ square tubing that ties the legs together, adds rigidity, and happens to be a good place to rest your feet while the fire’s going. Generally, the hardest part of this step is holding the ring at the right height while you get it square — which is exactly the problem the stop-block trick below solves.
- Determine foot rest height — typically 4–6″ from the bottom of the legs, and we set his at 6″. Mark all four legs at the same height with soapstone. Then cut four short offcuts of the same square tubing to use as stop blocks.
- Miter-cut the four foot rest pieces at 45 degrees, same as the top frame.
- Clamp a stop block to each leg with its top edge on your height mark, then set the foot rest ring down on top of the blocks. Instead of holding the ring at height while you fight it into position, the blocks carry it — leaving both hands free to square it up and clamp it to the legs.
- Check level on the foot rest before tacking — it should be parallel to the top frame. Because all four blocks were set off the same measurement, it should already be close; the level is confirming your marks rather than correcting the ring.
- Tack all four corners to the legs, pull the stop blocks off, then finish-weld. The foot rest welds are less critical than the leg-to-frame welds but should still be solid welds where the tubing meets each leg.
| FUN FACT: The triangulated structure created by the top frame, legs, and foot rest is the same principle used in trailer frames and equipment stands. Three horizontal planes connected by vertical members create a rigid structure that resists racking in any direction. That’s why a well-built fire pit doesn’t wiggle. |
Step 4: Build the Hopper Firebox
This is the most involved part of the build, and it’s what separates a DIY welded fire pit from a ring of stacked block. Generally, the hopper-style firebox tapers from the frame opening at the top to a smaller opening at the bottom, concentrating the fire and improving airflow.
The geometry: the four side panels are trapezoids — wider at the top to match the frame opening, narrower at the bottom where they meet the floor plate. On our build each panel measured 29″ across the top edge and 8″ across the bottom. However you approach it, lay this out on the plate with a straightedge and soapstone before cutting.
- Measure across the underside of the frame, not the clear inside opening. The panel tops weld flush to the bottom of the angle iron, so they run wider than the opening — ours came out at 29″ on a 30″ frame, leaving about 1/2″ of inset from each outside edge for the weld.
- Decide your taper — how much smaller the bottom opening will be. We went from 29″ across the top down to an 8″ x 8″ bottom — about 10-1/2″ of taper per side. That’s an aggressive taper that pulls coals into a tight bed; a gentler 4–6″ per side burns wider and still drafts well.
- Lay out all four hopper panels on the plate. Mark the cut lines and cut with a cutoff wheel or plasma cutter. If you’re building this with a kid, layout is a great job for them and cutting 1/8″ plate is not — a cutoff wheel in a long cut is unforgiving, and a bind or a shattered disc happens faster than a young welder can react. Let them mark it, you cut it.
- Test-fit the panels inside the frame before welding. They should lean inward at an angle and butt together at the corners. Trim if needed.
- Tack the four panels together at the corners inside the frame. Check that the taper is even on all sides before finish-welding.
- Weld the corner seams of the hopper fully — these are what contain the fire. Full penetration seams, no gaps.
- Cut the bottom plate to fit the hopper opening — 8″ x 8″ on ours. Drill or punch 4–6 drain holes (3/4–1″ diameter) for ash drainage and airflow. Weld the bottom plate in with a full perimeter weld.
- Offer the completed hopper up to the underside of the frame and clamp it so the panel tops sit flush against the bottom of the angle iron. Check the inset is even on all four sides, then tack it before running a full fillet weld along each panel top where it meets the frame — this joint carries the whole firebox.
This was the one step where he had help. The hopper geometry is three-dimensional in a way the rest of the build isn’t — flat trapezoids that have to lean inward and still meet cleanly at four corners — so we worked that part out together. He laid the pieces out on the plate and I made the cuts. He isn’t on the cut-off wheel yet, and at 11 that’s a line I’m not moving.
| PRO TIP: Weld the hopper corner seams from the inside when possible. Inside corner seams are stronger than outside lap welds on a containment structure like a firebox, and the angle makes it easier to get full fusion at the root. |
Step 5: Finishing
Wire brush all welds. Then inspect for any porosity or gaps, especially on the hopper seams — you don’t want fire finding a path through a bad weld.
Afterward, grind any rough edges on the top of the frame and anywhere hands will contact the structure.
One note if the project is headed to judging: we left his welds bare and unground so the judges could see the actual weld quality. Grinding and paint hide as much as they improve, and a judge is evaluating the bead, not the finish. Once judging is done, though, the piece still needs protecting from the weather.
For finish:
- High-temp flat black paint (rated 1,200°F+) holds up on the exterior away from direct flame contact — Rust-Oleum’s High Heat spec sheet confirms 1,200°F on fire pit exteriors but warns against surfaces in direct contact with fire
- The hopper interior will burn off any coating quickly — leave it bare or let it season naturally with a few fires
- Wire brush and re-coat the exterior once a season as maintenance
- Powder coating is the more durable route if you have access to it — it won’t survive direct flame contact inside the hopper any better than paint, but on the frame and legs it holds up far longer than a rattle can
He left his bare for the county and state fair judging. That was my rule, not the fair’s — it’s a welding competition, so no grinding the welds and no paint hiding them. He was going to be judged on his welding, and that meant the welds had to show.
What This Project Teaches
A DIY welded fire pit covers real ground for someone who’s done a practice project or two — and if you’re coming to MIG from stick or TIG like he was, a project this size is a good way to put real hours on the wire:
- Mitered corner joints and why squaring a frame before finish-welding matters
- Sequencing welds to control distortion — especially on the angle iron frame
- Checking plumb and level throughout an assembly, not just at the end
- Layout and geometry on non-rectangular parts — the hopper panels are a real exercise in thinking before cutting
- Containment welds where fit-up and full fusion matter, not just appearance
A DIY welded fire pit is a real project with real function. Moreover, when it’s done, you actually use it. Ultimately, that changes how seriously a welder approaches the work — especially a kid who’s going to stand next to it at a 4H show and explain how he built it.
For what it’s worth, the project was lights out and he did an amazing job. He took grand champion and state fair delegate at the county level, then reserve champion at state. He got beat by a high school junior with a genuinely well-done project — which, for an 11-year-old in his first eligible year, I’ll take.
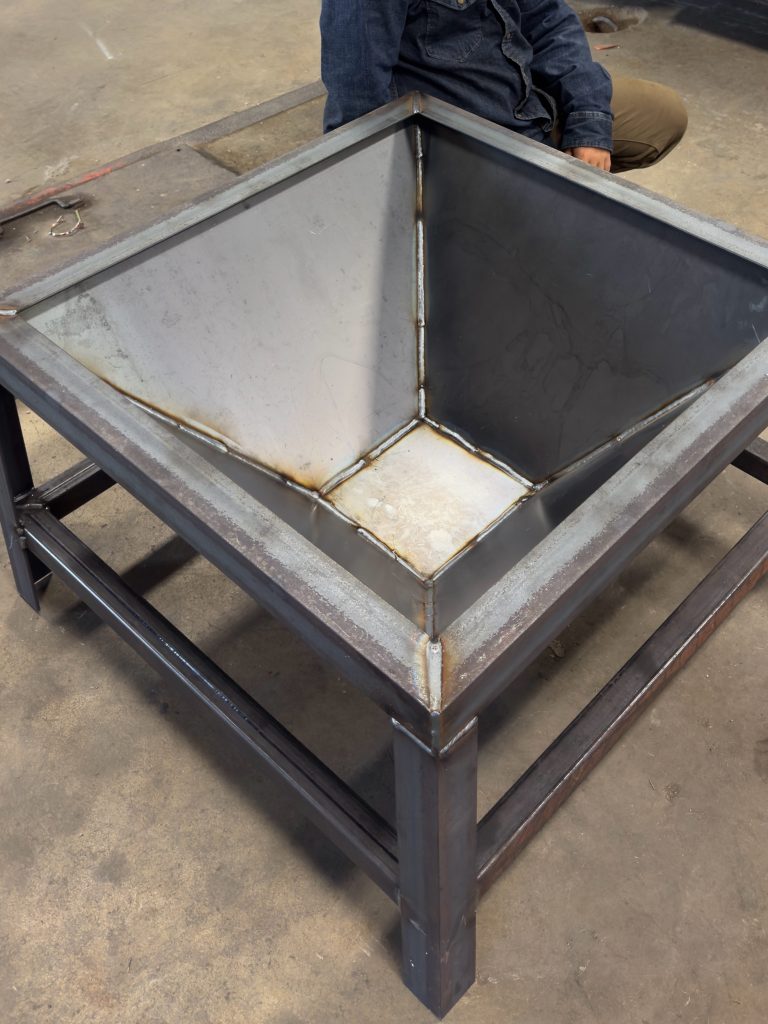
The finished hopper firebox, looking down into the taper. You can see the 8″ x 8″ bottom plate, the drain holes, and the 2″ of frame standing proud as a rim above the panel tops.
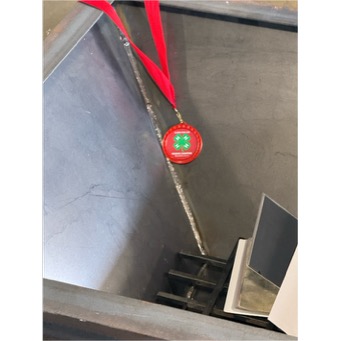
Reserve champion at state, hanging on the hopper seam. Welds left bare and unground for judging — this is the corner seam a judge was looking at.
| NEXT STEP: Check our gate latch guide for another quick farm weekend project. A trailer hitch receiver walkthrough is coming soon — that one steps up into structural welding where the stakes are higher. |